In this article, we will have a closer look at buoys, marks and beacons that you may come across in your travels on your yacht. This will not be an exhaustive list of marks but it will help you understand the basics …
Lateral marks
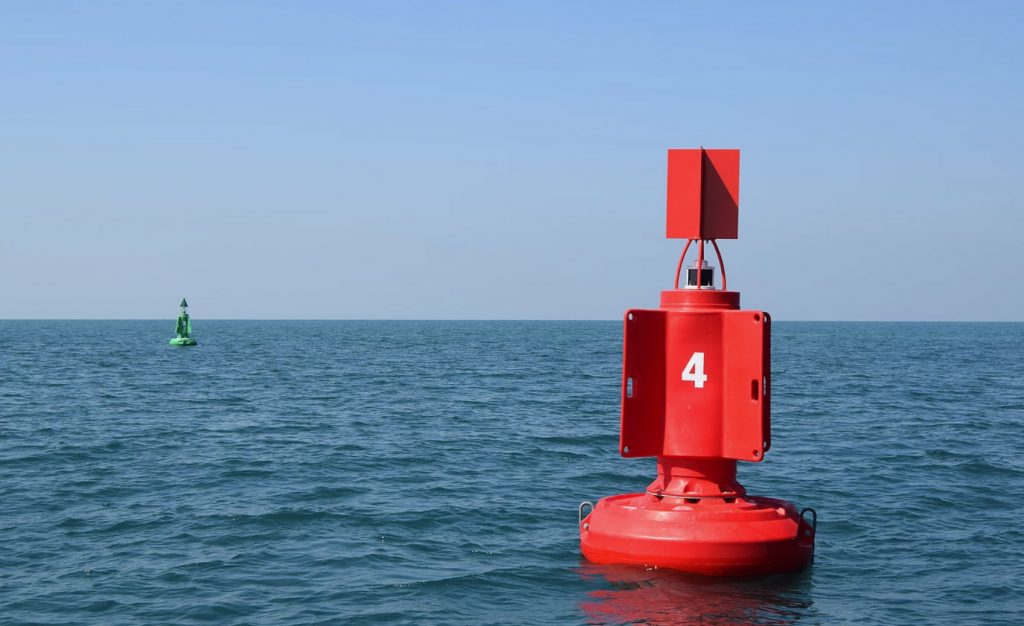
Lateral markers indicate the lateral extremities of navigatable waterways and channels. The left side or port side (red side) on one end and the starboard side or right side (green side) on the other.
When you see a port and starboard lateral mark together with some space in between, it is advisable to use this space and manoeuvre your boat in between the two marks. Often, there is a series of port and starboard lateral marks which clearly indicates a channel you can follow to avoid dangerous or shallow water outside that channel.
Sometimes you find just one single lateral mark. When there is only one lateral mark, you need to pass it on the safe side. What determines the safe side depends on if you are coming or going and can also be found on your map. This is referred to as buoyage.
When travelling upstream or from the sea into a waterway, channel or port, you need to leave the red port lateral mark to your port and the green starboard lateral mark to your starboard.
When travelling downstream or to the sea, it is the opposite. You need to leave the red port lateral mark to your starboard and the green starboard lateral mark to your port.
Sometimes you find a single lateral mark between two islands and it is not clear which way is to the sea or downstream. In those circumstances consult your map which will tell you what you want to know.
I always think port to port “You can only enjoy a port after a day’s sailing and not before.”
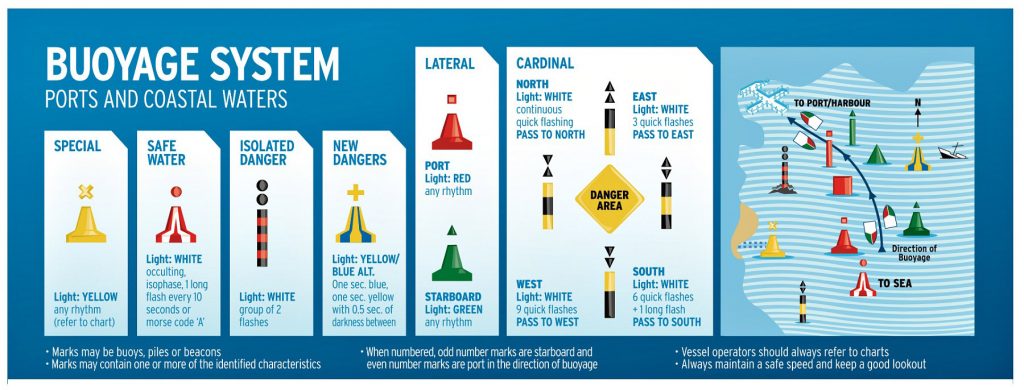
Lateral marks look something like this…
PORT
A port mark is red with a can-like shape.
At night, a port buoy shows a red flashing light (when lit).
STARBOARD
A starboard mark is green with a triangle shape.
At night, a starboard buoy shows a green flashing light (when lit).
But wait. That is too simple I hear you say.
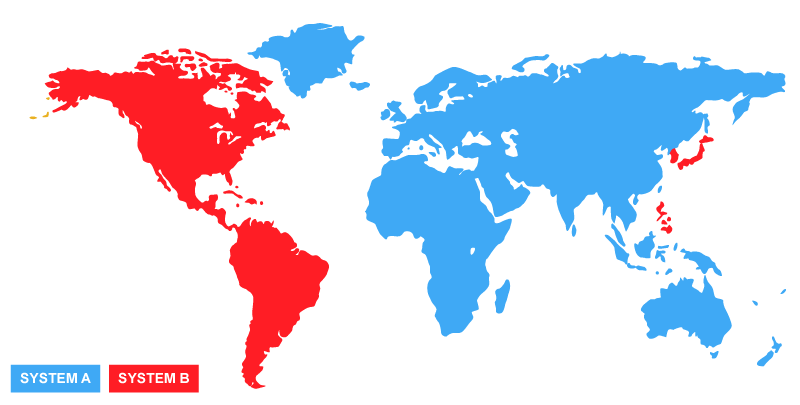
So naturally, the Navigation and Lighthouse Authorities (IALA) said: “We can complicate this. We just reverse the entire system in some parts of the world, call it system A and system B and voila, enough confusion to keep us all in jobs…”
So system A (the one just explained) is operational in Australia, Europe and most of Asia.
System B (the opposite) is operational in the Americas as well as some Asian countries.
IALA System A and System B
Cardinal marks
Cardinal marks indicate where there is safe water (and consequently where there is not). It does this as the name suggests by using a compass system.
You may find a cardinal mark near a submerged rock, or two at either side of an elongated reef or simply neer shallow waters.
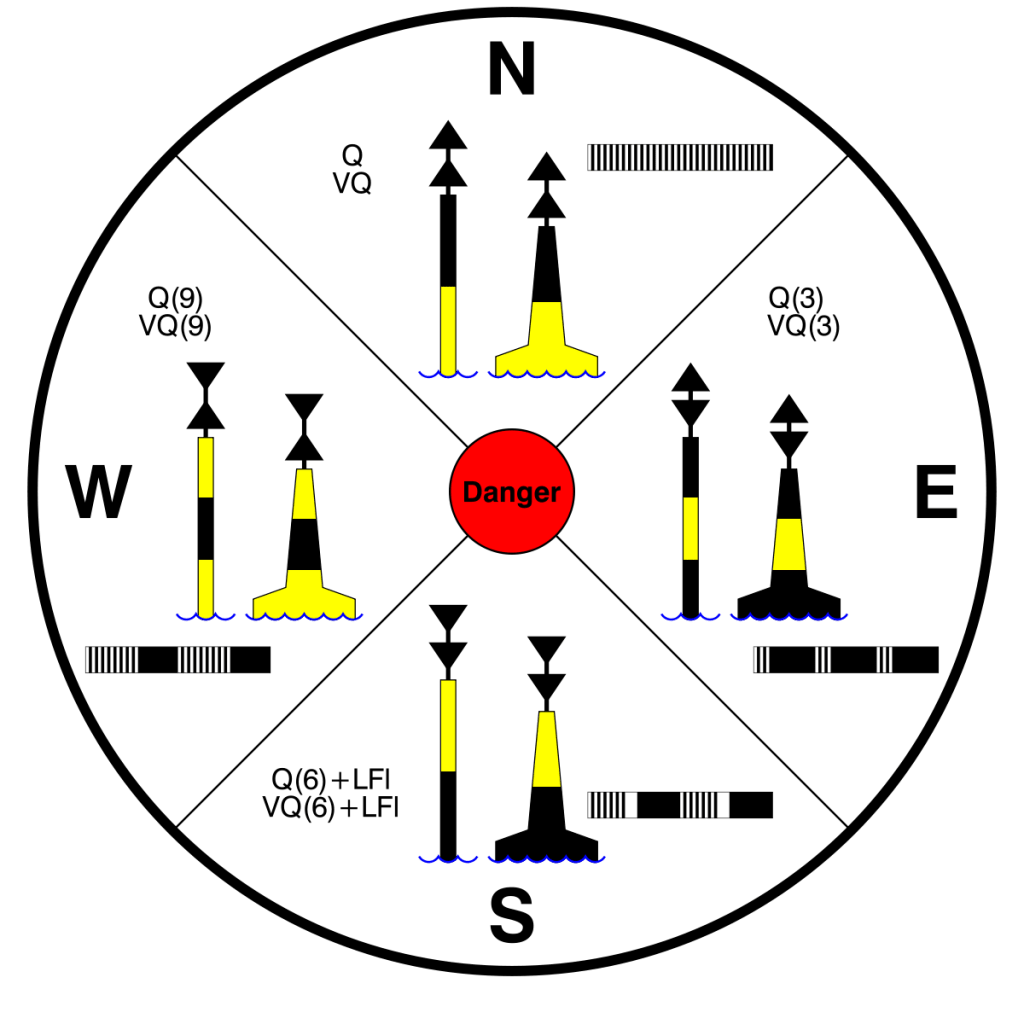
Cardinal marks have black and yellow bands with black double cones on top showing the different compass direction that identifies the safest and deepest water to travel in.
Let’s have a look at these in more detail below…
Ready Reckoner - Stick it in your cockpit as a reference...
Let’s look at an example. You are sailing along and you see a stick in the water. On closer inspection, you recognise it as a cardinal mark because you can see black and yellow bands. The first thing you should consider is that there is danger up ahead and this cardinal marker will tell you where you can safely sail to avoid this danger. You can now see that the two triangles are both pointing up. This means safe water to the north. So you decide to use the water to the north of the cardinal mark and continue your journey.
Note that the mark is not saying exactly where the danger is or what the danger is. It is merely saying how to stay clear of the danger by indicating the navigable water to its north.
So recognising north is easy (both pointing up). From there you can also reason that two triangles pointing down is safe water to the south. East and west are a bit harder to remember. I use to think of the two triangles pointing at each other as a “W” at 90 degrees. This leaves east where the triangles point away from each other.
You can also use the black and yellow colour bands to identify the mark. Think of the triangles always pointing to the black. For example, a black top and yellow bottom means safe water to the north as the triangle point to the top (top is black). For the west, the triangles point to the middle which means that you find the black in the middle: you get the point…
At night, the cardinal marks flash to indicate the four different points on the compass. The north cardinal mark flashes continuously, east flashes 3 times then pauses, south flashed six times then pauses and west flashes nine times and pauses. Recognise a pattern? Yes, it is easy to remember because it is like a clock face. East at 3, south at 6 (+1) and west at nine o’clock with north continually flashing.
Let’s look at the day and night time cardinal marks below…
NORTH
North daytime - safe to the north
NORTH night-time - continuous flashing
EAST
Cardinal Mark Daytime - safe to the east
EAST night-time - 3 flashes
SOUTH
Cardinal Mark Daytime - safe to the south
SOUTH night-time - 6 flashes
WEST
Cardinal Mark Daytime - safe to the west
WEST night-time - 9 flashes
Isolated danger marks
Unlike a cardinal mark which indicates safe water on a specific side, isolated danger marks show where there is a specific danger that has navigable water all around it. For example, a submerged rock or wreck. So you can sail all around it but obviously at a safe distance.
Isolated danger marks can be recognised by their black body with one or several red horizontal bands and 2 spheres at the top of the isolated danger mark.
At night, the isolated danger mark flashes 2 pairs of white light.
To remember isolated danger marks, think “Two for Tragedy”.
Isolated danger mark daytime
Isolated danger mark night-time - 2x2 flashes
Safe water marks
Unlike isolated danger marks, safe water marks show that there is safe and navigable water all around it. You may see these marks at the end of a channel denoting that you reached the open sea.
Safe water marks are red with white vertical stripes with a single red sphere as the top of the mark.
At night, you can see a long 10-second white flash.
Safe water mark daytime
Safe water mark night-time - one long flash
Special mark features
Special marks show a specific issue you need to know about such as a sunmerged pipe or cable or where the channel splits into two different directions.
They can also mark a channel within a channel. For example, a channel for deep draught ships in a wide river or bay where the limits of the channel for normal navigation are marked by red and green lateral buoys or beacons.
You need to consult your map as to the specifics of the mark and which way to sail around it.
Special marks are yellow and usually have a yellow “X” at the top of the mark.
Sector lights, directional lights and leading lights
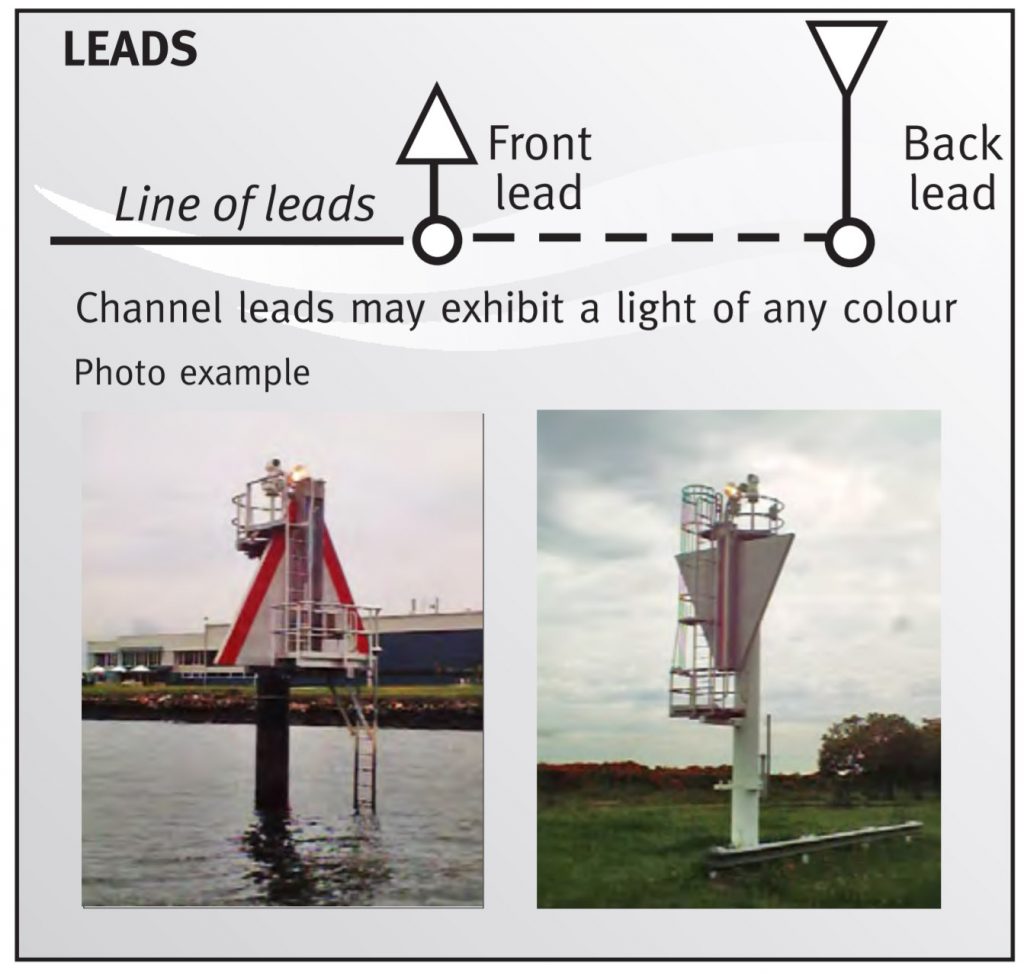
Leading lights
Leading lights can “guide” you into a port or channel. They consist of two beacons that are geographically apart by some distance. The front shorter beacon often has a triangle pointing up whereas the further taller beacon has a triangle pointing down. At night there could be lights on the beacons of any colour. Line up the triangles or lights and you are on a safe bearing.
Note that being in the centre of the channel is a good thing by itself. However, these leading lights are designed to guide very large ships into ports and harbours so be very aware of traffic within the channel. Consult your AIS and radio when using leading lights…
Sector lights
Sector lights are the same as leading lights in that they can guide a ship into a port or harbour on a safe bearing.
Sector lights display a different colour light depending on the angle you look at them.
If they display red it means that you are on the port side of the channel and you need to steer your boat to starboard until the red changes into white.
If you see a green light, you are too far to starboard and you need to steer your boat to port until you see the white light.
If you see white light you are on the correct bearing
Directional lights
Directional lights are similar to sector lights in that they guide a vessel into the harbour in a very narrow channel. There are no coloured lights flanking a directional light.
You can find directional lights on your map where it will give you a bearing of approach. Once you see the light, apply that map bearing and you should be in the channel towards the harbour.
If the article was helpful then don’t be afraid to share it on social media. Also, we love to hear from you so leave a comment below…